Introduction
Transferring photos from iPhone to Mac is essential for managing, storing, and editing your valuable memories. With the advancement of technology, multiple methods have emerged to facilitate this photo transfer, each offering its own advantages and convenience.
Methods for Photo Transfer
Various methods are available for transferring photos from iPhone to Mac, including:
- Using a USB cable
- Utilizing iCloud Photo Library
- Employing AirDrop
- Leveraging third-party apps
Method 1: Using iCloud

iCloud is a cloud storage service provided by Apple that allows users to store photos, videos, documents, and other files online. You can use iCloud to transfer photos from your iPhone to your Mac by following these steps:
- On your iPhone, go to Settings > iCloud.
- Tap on Photos.
- Turn on iCloud Photos.
- On your Mac, open the Photos app.
- Click on the iCloud tab in the sidebar.
- Your iPhone photos will now be available in the Photos app on your Mac.
Advantages of Using iCloud
There are several advantages to using iCloud to transfer photos from your iPhone to your Mac:
- It is a wireless solution, so you don’t need to connect your iPhone to your Mac with a cable.
- It is automatic, so you don’t have to manually transfer your photos.
- It is secure, as your photos are stored on Apple’s servers.
Disadvantages of Using iCloud
There are also some disadvantages to using iCloud to transfer photos from your iPhone to your Mac:
- It requires an internet connection.
- It can be slow to transfer large numbers of photos.
- It can take up storage space on your iCloud account.
Method 2: Using AirDrop
AirDrop is a wireless technology that allows you to quickly and easily transfer files between Apple devices. It’s a great way to share photos from your iPhone to your Mac without having to use a cable or cloud service.
To use AirDrop, both your iPhone and Mac must be turned on and have Wi-Fi and Bluetooth enabled. You’ll also need to make sure that AirDrop is turned on on both devices.
Sending Photos Using AirDrop
- Open the Photos app on your iPhone and select the photos you want to transfer.
- Tap the Share button and then select AirDrop from the list of options.
- Your Mac should appear in the list of AirDrop recipients. Tap on your Mac’s name to send the photos.
Receiving Photos Using AirDrop
- When you receive a photo via AirDrop, a notification will appear on your Mac.
- Click on the notification to open the photo in the Photos app.
Advantages of Using AirDrop
- Fast and easy to use
- No need for cables or cloud services
- Works with all Apple devices
Disadvantages of Using AirDrop
- Only works between Apple devices
- Can be affected by Wi-Fi and Bluetooth interference
Method 3: Using USB Cable
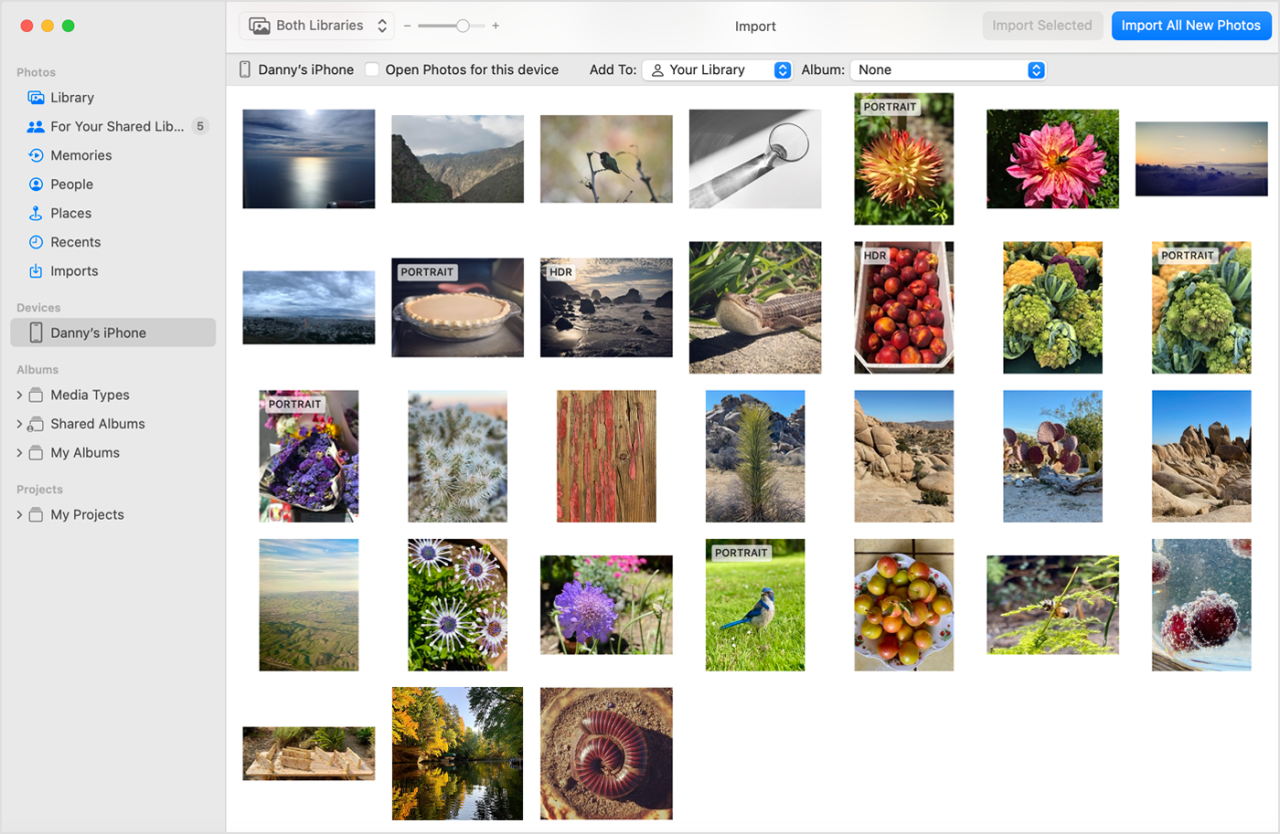
Transferring photos using a USB cable is a reliable and straightforward method. Here’s a step-by-step guide:
1. Connect your iPhone to your Mac using a USB cable.
2. On your Mac, open the Photos app.
3. Click on the “Import” button in the upper right corner.
4. Select the photos you want to transfer and click “Import Selected.”
Using a USB cable offers several advantages. It provides a stable and fast connection, allowing for the transfer of large files without interruptions. Additionally, it doesn’t require an internet connection, making it convenient for areas with limited or no Wi-Fi.
However, using a USB cable also has some drawbacks. It requires a physical connection between the devices, which can be inconvenient if you don’t have the cable or if you need to transfer photos wirelessly. Additionally, using a USB cable may not be compatible with all devices or operating systems.
Method 4: Using Third-Party Apps

If you’re not satisfied with Apple’s native options or prefer a more customized approach, you can use third-party apps to transfer photos from your iPhone to your Mac. These apps often offer additional features and flexibility, such as selective transfer, file management, and photo editing capabilities.
Here are the steps to use a third-party app to transfer photos:
- Download and install a reputable third-party photo transfer app from the App Store.
- Connect your iPhone to your Mac using a USB cable.
- Launch the third-party app on both your iPhone and Mac.
- Follow the app’s instructions to establish a connection between your devices.
- Select the photos you want to transfer from your iPhone.
- Initiate the transfer process within the app.
Advantages of Using Third-Party Apps
- Selective Transfer: Allows you to choose specific photos or albums to transfer, rather than transferring the entire library.
- Enhanced File Management: Provides features for organizing, renaming, and deleting photos on both devices.
- Additional Editing Capabilities: Some apps offer built-in photo editing tools, allowing you to make adjustments before transferring.
- Customization Options: Many third-party apps offer customizable settings and preferences to tailor the transfer process to your needs.
Disadvantages of Using Third-Party Apps
- Security Concerns: Some apps may require access to your photos and device data, raising privacy and security concerns.
- Compatibility Issues: Not all third-party apps are compatible with all iOS and macOS versions, so compatibility should be checked before use.
- Potential Costs: While some apps are free, others may require a subscription or one-time purchase for premium features.
Troubleshooting

Photo transfer between iPhone and Mac can occasionally encounter issues. Here are some common problems and their solutions:
Before troubleshooting, ensure that both devices are connected to the same Wi-Fi network and have the latest software updates installed.
iCloud
- Photos not syncing: Check your iCloud settings on both devices to ensure that iCloud Photos is enabled. Sign out and sign back into iCloud on both devices.
- Slow transfer speed: A weak Wi-Fi connection can slow down the transfer process. Move closer to the router or use a wired connection for faster speeds.
AirDrop
- AirDrop not working: Ensure that both devices have AirDrop enabled and are within Bluetooth and Wi-Fi range. Check that the receiving device is set to accept AirDrop from “Everyone” or “Contacts Only.”
- Photos not appearing on the receiving device: The photos may be too large for AirDrop. Reduce the photo size before attempting to transfer.
USB Cable
- iPhone not recognized by Mac: Try using a different USB cable or connecting to a different USB port on the Mac. Restart both devices.
- Photos not importing: Ensure that the Mac has the latest version of the Photos app installed. Check the “Import” settings in the Photos app to customize the import process.
Third-Party Apps
- App not working: Ensure that the app is up-to-date and compatible with your iPhone and Mac. Check the app’s documentation or contact the developer for support.
- Photos not transferred successfully: Follow the app’s instructions carefully and ensure that both devices are connected properly.
Conclusion
In summary, transferring photos from iPhone to Mac is a straightforward process with several options available. The most suitable method depends on factors such as convenience, speed, and the number of photos being transferred.
For quick and wireless transfers, AirDrop is a convenient choice. iCloud provides seamless synchronization and automatic backup, making it ideal for large photo collections. Using a USB cable offers the fastest transfer speeds and direct device connection. Third-party apps provide additional features and customization options.
Recommendation
For the best overall experience, we recommend using iCloud for automatic and continuous photo backup and synchronization. AirDrop is an excellent option for quick and easy wireless transfers of smaller photo collections. For the fastest transfer speeds and direct device connection, using a USB cable is the preferred choice.
FAQ Corner
Can I transfer photos from my iPhone to my Mac wirelessly?
Yes, you can use iCloud, AirDrop, or third-party apps to transfer photos wirelessly from your iPhone to your Mac.
What is the fastest way to transfer photos from my iPhone to my Mac?
Using a USB cable is the fastest method to transfer photos from your iPhone to your Mac.
Can I transfer photos from my iPhone to my Mac without using iTunes?
Yes, you can use iCloud, AirDrop, or third-party apps to transfer photos from your iPhone to your Mac without using iTunes.
What should I do if I encounter issues while transferring photos from my iPhone to my Mac?
Refer to the troubleshooting section of this guide for solutions to common issues related to photo transfer.


